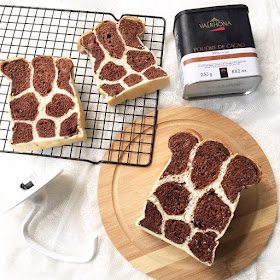
When my blogger friend Fion and May told me about this popular Giraffe bread in FB, i was so excited and tried it out immediately ^_^.
This decorated bread loaf is quite easy to make, and it create great result !
Try to roll them into longer log. I admit that i didn't handled well the rolling, resulted uneven shape of bread loaf (one side taller and another shorter). Before cut, the shape look like bear paw, hehehe..
I didn't follow the original recipe using bread maker, instead i modified from Champion Toast recipe.
Giraffe Patches Bread Loaf 长颈鹿花紋土司*for a 11cmx20cm (internal), non-stick Pullman tin375g bread flour35g sugar1/2tsp fine salt20g butter1tsp instant dry yeast250g fresh milk ( I use cold milk from fridge)
20g cocoa powder ( I use Valrhona cocoa powder)15g fresh milk
Method1. Mix bread flour, sugar and yeast in the mixing bowl, mix well.2. In a stand mixer, add in salt and milk, mix into a dough using low speed, then use medium speed to knead it into a shiny and smooth texture.3. Add in butter, then knead it using medium speed until it forms dough that shinny and smooth ( I use KA mixer, took about 20mins).4. Remove 230g plain dough, place in another clean bowl and set aside to proof till double.5. Add in cocoa powder and milk in remaining plain dough, continue run the mixer and mix well. Set aside to proof till double.6. Divide the plain dough, 1 portion x 71g (large), 3 portions x 53g(small) (depend the final weight and adjust accordingly).7. Divide the chocolate dough, 1 portion x 138g(large(), 3 portions x 115g(small) (depend the final weight and adjust accordingly).8. Use a rolling pin, roll chocolate dough to a flat oval shape, then roll it like swiss roll.9. Use a rolling pin, roll plain dough to a flat oval shape. Place the chocolate dough on plain dough, cover the chocolate dough with plain dough and seal. Gently roll them into 24cm long log. Repeat till all finished.10. Divide each dough into two portions. First stack 3 small dough in the prepared loaf pan, followed by 2 large dough and top with the balance 3 small dough. Set aside to proof for another 30-45mins.11. Bake at a pre-heated oven at 180C for 10mins, tent the top with foil (to prevent further browning), continue bake for 15mins, then another 10mins with fan forced. Every oven is difference, please adjust temp and timing according to your oven.12. Once done, cool on wire rack before slice them.
Recipe reference to here, recipe by Sonia a.k.a Nasi Lemak Lover


Looks very beautiful dear..I have tried marble bread but this looks superb
ReplyDeleteSonia, u are amazing.
ReplyDelete你的行动好快啊! 这边才说说,那边就出炉了!
ReplyDelete哈。。。。。可爱!有可爱的长颈鹿土司!
Hi ah Chi,
ReplyDeleteThis is so cute. Can send a piece over :p
mui
Hi Sonia, your giraffe patches bread looks so beautiful and soft too. Could you tell me where I can get the Valhona cocoa powder in KL?
ReplyDeleteVeronica, you can get it at Big supermarket at Publika KL
ReplyDeleteAny idea if milo powder will turn out the same?
ReplyDeletespectacular!!
ReplyDeleteSuch a fun bake, Sonia ! The printing looks perfect. Happy Weekend.
ReplyDeleteBlessings, Kristy
恭喜你!获得多才多艺奖章一枚。
ReplyDelete恭请到这里:http://auntyyoung.blogspot.com/2015/08/egg-tart-versatile-blogger-award.html领奖,谢谢。
Anonymous, yes you can replace with milo but I guess the colour will slightly lightly .
ReplyDeleteU r right Sonia colour lighter not as nice looking. texture and taste is good though. many thanks.
ReplyDeleteThanks Sonia
ReplyDeleteThanks for share Sonia...really love it..
ReplyDeleteWow! This one looks amazing! I shall try this
ReplyDeleteWow! This one looks amazing! I shall try this
ReplyDeleteHi, how do you mix the cocoa powder so well ? If using Panansonic BM, i will be suing Menu 8 and quickly i have to mix and put in back and bake. I tried before and the cocoa powder does not blend well using hand.
ReplyDeletePlease advise how you did it so blendly mix.
Thanks.
Shirley , I used KA mixer to mix the cocoa powder with plain dough .
ReplyDeleteThanks Sonia, what is KA?
ReplyDeleteShirley , Kitchen aid brand
ReplyDeleteHi Sonia, This looks very nice! Must the tin be non stick? Any effect on the proofing? Many thanks.
ReplyDeleteJust come across this bread recipe tonight and was thrilled. I have actually never seen it like this on the inside. I can't wait to try it. Thank you 💜
ReplyDelete