

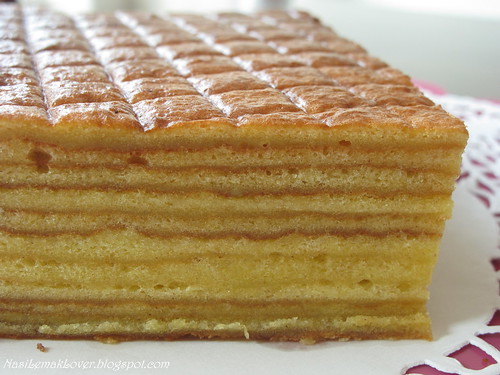
This was my 1st attempt baking a Kueh Lapis, it took me 2 hours to make this. I baked this cake is meant to pray for "Pai Tin Kong". Last year I did a tiger fondant cake.
My mom actually expecting me to make a nice fondant cake, maybe with a rabbit fondant. When she see this Kueh Lapis, she was a bit dissapointed because there is no decoration but just a plain cake. But I tell her "Tin Kong" will appreciate my effort since i spent 2 hours to make this, hehehe..
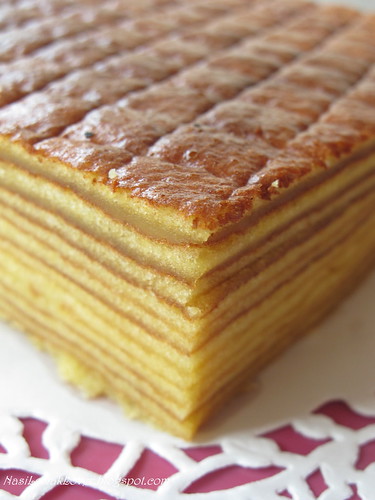
I made alteration on the ingredients as I only has a 8" square tin and I managed to make 11 layers.
Kueh Lapis
*makes a 8” square baking tin
(source: recipe was adapted from Wens' Delight, recipe by Richard Goh)
Ingredients:
(A)
300g butter
120g Condensed milk
1tbsp Rum liquor
90g Cake flour
1/4tsp Lapis spice (All spice)
B)
12 Egg yolks (big)
85g Castor sugar
SP (optional - help to stabilise the egg yolk mixture and reduce the bubbles, also make the cake softer)—I did not add this
(B)
6 Egg whites
55g Castor sugar
1/4tsp Cream of tartar
Method:
Preheat oven to 200 deg C top and bottom heat. Warm up the baking tin before greasing and lining the base with baking paper
1. Cream butter, condensed milk and rum liquor at medium speed for abt 5-10 mins until fluffy and creamy. Add in the sifted flour and spice. Mix well and set aside.
2. Whisk egg yolks and sugar at max speed until thick. Add this mixture into Step 1 (butter mixture) gradually till well mix.
3. Whisk egg whites, sugar and cream of tartar in a clean mixing bowl at max speed until stiff.
4. With a handwhisk/spatula fold 1/3 of the egg whites into Step 2 mixture and continue the process of folding the rest till two mixtures are well incorporated.
5. Place the baking paper on the preheated tin. Spread a small amount of batter (about 90-100g, weigh the batter to ensure even layer) on the warm tin and bake till golden at the center rack. Take about 5-7mins for the 1st layer.
6. Second layer onwards, increase the oven temp to 220 deg C at top heat only(if your oven has “grill” function). Subsequent layer takes about 3-4 mins to bake.
7. Use a metal presser to lightly press each baked layer before adding new batter. Spread the batter evenly till it melted. Before going into the oven, give it a bang to let out the air bubbles. This will help to even out the layers too. Continue baking the cake by the layers until the batter uses up.
Note: For ovens that do not allow the setting of top heat only, place a baking tray of water at the bottom of the oven.
* This cake was well received by all, very buttery, full of Rum and all spices aroma.
Today is the last day of CNY, Happy "Chap Goh May"
元宵节快乐 !!
元宵节快乐 !!


60 comments:
very beautiful kueh lapis! haha i think ti gong will appreciate your effortss!
Second jess kitchen!
Beautiful kueh lapis on your first attempt ;)
cantiknya .Membuat kuih lapis mesti mempunyai kesabaran yang tinggi.kena tahan panas muka yang mengadap depan oven:).tahniah ya sb berjaya menghasilkan kek lapis yang kemas & cantik.
this is so nice!
i did this cake once and i spent 1 hour plus in front of oven doing layer by layer :P
adding rum is somthing i will try the next time i make this cake again
thks! :P
first attempt and you had this result? WOW! great job, Sonia!
quite exhausted to make kuih lapis!
To me, i rather buy than do ..wakaka!
Very nice! This kuih lapis really requires a lot of effort, sure ti gong will appreciate this!
can't believe it is ur first attempt. this is pretty. making kuih lapis is really tedious in work.
WHoah! yours is really very nice! I burnt one layer~! HAHA!! I will try this recipe next time..it's like quite similar to the recipe that i've tried, just that less amount of butter and eggs used~ thanks for sharing!
Coraine @ life is like a long journey
第一次就酱漂亮了喔,要为你鼓掌:P
sonia, so glad to see you're back to blogging here. your kuih lapis is absolutely beautiful, i shall keep this recipe.
i am so blessed to taste it myself. It was so yummy! Great job!
Sonia, your kuih lapis is so beautiful!! So much effort in baking one, I'm sure Ti Gong will be happy :)
Yummy cake! Mouthwatering!!
Ton gâteau est absolument magnifique.
J'en prendrai bien un morceau.
A très bientôt.
Sonia, your kuih lapis is so well baked and I love the layers, so neat :)
元宵节快乐!!
oh wow! this is very very good for a first attempt! might better than mine for sure! haha well done!
Hi Sonia,
Happy Yuan Xiao Jie! Glad that u like the recipe as much as I do. Great job!
Wow 2 hours of hard work, but the payoff is great when you get to eat it.
This is one of the most beautiful layer cake I've seen so far...nice work!
bravo,d kueh lapis is so nice ^^
happy chap goh mei!
i love making kek lapis now... :)
wowwwwwwwwwww che meraviglia!!!!!!
Looks fantastic!
Wow beautiful & so perfect.Great job!
http://www.easycookingforamateurs.com/
wow, beautiful! Lots of work, but so worth it!
Wow, it's so nice...
This is done with ur new Teka oven or the old one?
Oh ya, I forgot to ask you that day abt ur new oven. Too bad I can't go for the next meeting.
Sonia's Kaima, U'r such a good cooker n baker!
Always challenging the tough one!
I Love the color and appearance!
Gosh, Sonia, that 2 hours of hard labour is well spent! The ultimate result is just LOVELY!
Sonia, this looks amazing! My hubby just asked me to make this cake and you posted the recipe. How timely. Thank you my dear.
LOL! HAHAHAHA! OMG! Damn funny lar you! Tin Kong of course will appreciate you slogging for 2 hours in the kitchen! You perspired a lot during that time, ya know! HAHA! Your kek lapis looks so goooood!
gosh...kueh lapis.. expensive outside cos involves a lot of labour, right? my kids love this..
Sonia,
The cake looks beautiful!!!
One of the most time-consuming cake to bake and you did it! :D
很幸运的我....我也有份尝到这个好吃的kuih lapis.
你这么用心做这么好吃的kuih lapis 天公一定保佑你们的.。。
omg! 2 hours! im sure ti gong will appreciate your effort (: those layers are so beautifully done! and it look realy delicious! (:
"only" 11 layers? sonia, I dont even have the heart to make this because it takes so much effort!!! Well done. I love how buttery and melt in the mouth it looks.. bet it tastes just like that.
I love this recipe and all of your recipes. I will be spending some time with your blog today. Thanks Sonia.
Very nice baked lapis! For the first time, you already baked the layers so neat ... I remembered my first time, I so scared getting burn ... end result cannot see the layers LOL.
Amazing! It looks delicious and so perfect that it looks like it belongs in a bakery!
i love to eat it, but hard to do it right? cos too much step.....:)
I love eating kuih lapis but have not bothered to make it myself. Yours look so good and I can't believe it is your 1st time baking it too!
You are really patient enough to make kuih lapis !
Salute !
Your layer cake is perfect!!! I want to try to make it soon.
Sonia, your kuih lapis looks really nice and good. This is my favourite but I am not sure when then I will attempt it, too tedious for lazy people like me :P
Thanks for stopping by my blog! My grandpa used to live in Jakarta and he always brought back these cakes whenever he visited us. I love them...but 12 egg yolks...i'll need to save up my quotas before making them! just kidding ;)
Very nice baked lapis! For the first time, you already baked the layers so neat ... I remembered my first time, I so scared getting burn ... end result cannot see the layers LOL.
Hi Sonia, what does SP stand for?
Thanks
SP meant cake emulsifier ,
A kind of chemical gel to stabilized the cake batter
Thanks, Sonia =)
Hi Sonia! Baked this and it was a success :) I have to put more spice next time but thank you for the recipe :)
Hi Sonia, I though of baking this lapis for CNY, and I have a few question. I only have a 9 inch cake pan, do I need to increase the recipe? Can I skip the Rum or replace by baileys or vanilla extract? My oven have a grill function, but I cant adjust the temperature for that function, do you advise to use grill function or the water bath method with the top & bottom heat? Thank you!!
Michelle, yes maybe you can increase 1/4 of the recipe for 9" cake tin size . Ya you can replaced Rum with others . I suggest you use grill function since each layer is thin, just to watch out the cake during baking .
Thanks Sonia!! Anyway to reduce the sugar? I made it last week but it's a bit sweet for my family.
Hi Sonia
Do you use golden churn for the lapis? Beautiful came.
Hi Sonia I tried to bake this cake, it turned out still satisfactory, tasted good & layers are visible except the bottom half feels heavy when I hold the slices in my hand and bottom first layer look oily & little transparent. Can you please advise what went wrong?
Thanks
Jesline
Can I know what is the all spice...? Where do I get it...? Thank u
Can I know what is the all spice...? Where do I get it...? Thank u
Hi, I am very excited when I found your blog. I was looking for making lapis legit with electric oven. For sure your cake was turning beautiful 😍
Can you explain to me how to bake in electric oven. I will appreciate it.
Regards
Sari
Post a Comment