


Let me show you how to make them...


I need little hand of my little son Desmond on rolling these tiny balls for the ear ^_^


Actually the first batch i made these Winnie the Pooh bread buns that using pumpkin dough..

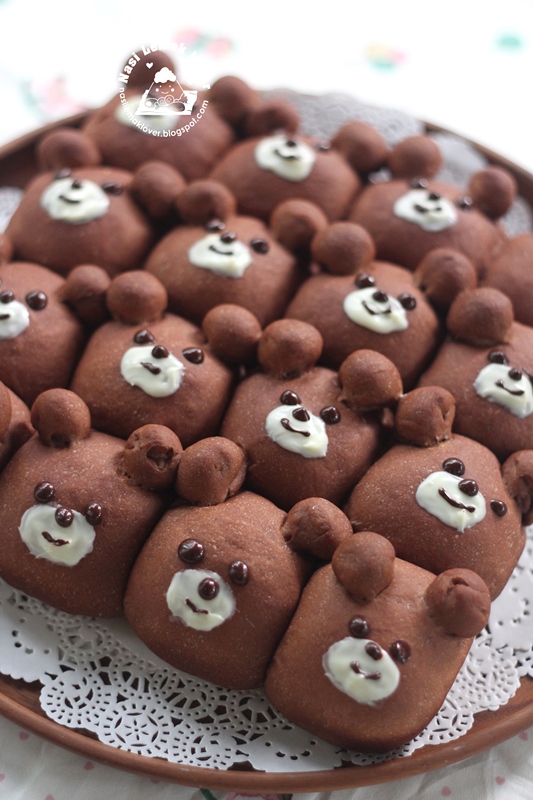
Since these are hand made, so they have difference face expression, so cute!


They are too cute to be eaten ^_^

Bear Cartoon Character Bread Buns 小熊小面包For the bread350g High protein flour or bread flour40g caster sugar15g cocoa powder (I use Valrhona cocoa powder)1/2tsp fine salt1tsp instant yeast230g fresh milk25g unsalted butter, room temperature
For decorate the bear faceWhite chocolateDark chocolatemilkMethod
- In a stand mixer, add in bread ingredients except butter, mix and knead till smooth.
- Add in butter, knead till elastic and shining dough. Cover and set aside to proof till double in size.
- Punch down the dough to expel air, to weight 35g each for 16 portions for the body and shape into round ball. And also to weight 2g each for the ear for 32 portions, rest for 15mins.
- Take 35g dough and fill in ~1tsp Nutella, wrap and shape into ball, place into a baking pan (9’x9’), repeat till finished.
- Brush milk on the dough, then place two 2g dough for the ear, lightly press to stick. Repeat till all ear dough finished .Cover and let is proof for another 30-45mins.
- Bake at pre-heated oven at 180C for 20mins, remove from baking tin, set aside till completely cool down before decorate it.
- Melt white chocolate, then use a Chinese brush to paint at the centre. Melt dark chocolate, fill in a piping bag, then make the eyes, nose and mouth.
- Store in air-tight container to avoid bread buns turned dry quickly.
Recipe by Sonia a.k.a Nasi Lemak Lover


38 comments:
OMG! These are soooooo cute. I can't bear to eat them.
Omg.. they are so cute!! I am going to save yr recipe for later. Will make this for my daughter. Thanks for sharing! :)
Jean
OMG that can't be real....it's major cute! Too 'sayang' to eat!
Ideal for kids' party. They will definitely love these bear buns.
Hi Sonia, so cute your bears! Can have one please ?
Hi Sonia, so cute your bears! Can have one please ?
Wow, so cute the bears, children sure love it very much !
<3 <3 <3
Who could resist having these cute and adorable buns. Although I agree that they might be too cute to be eaten. Thanks for sharing, Sonia.
Hi Sonia, the bear buns are so cute that I want to pinch their cheeks......indeed so nice to look at but can't bear to eat them. Thanks for sharing this recipe
Adorable! Thumbs up!
Oh so cute! So adorable!
so cute loh, haha~
Regards,
(A Growing Teenager Diary Malaysia)
What an adorable bear! Kids sure love it!
Thumbs up for you!
oh wow these are adorable and love that your son helped
Hi Sonia! I can't wait to try these and have posted on pinterest so I can find later!!
Also Do you have a recipe for the winnie the pooh ones too?
So beary cute!
Oh my!So cute!!
This is really cute and must be yummy too.I am going to try this out , think my kids would love to help out piping.:)
Awww, they are just too adorable to be eaten!
Thanks for sharing. So cute..Will definitely try! Suk Chen
aiyoh....they are all so cute...... makes me feel like making some too :)
These buns are soooo cute ! I want a few too.
Kristy
hiii, thanks so much for sharing the recipe!
Just want to ask for step 1 & 2, can I use mixer or should I use hands?
Previously I tried your sausage roll recipe and the dough couldn't rise, I wonder is it because I kneaded it for too long?
Thanks in advance :)
Pris, for step 1 & 2, i use KA stand mixer. Ya, do not over knead the dough, usually when i use KA mixer, it took 20mins from begining till dough is done. Also to rise a good dough, you need warm weather, so try to do it during hot weather time.
Hi, may I know what is the different of this recipe compare to the overnight dough recipe? Will the bun soft as overnight dough recipe?
Pls advise. Tqvm
Anonymous , it is still soft after overnight but not as moist if compare to overnight dough.
Hi,
May I know when you said "knead till elastic and shining dough", is this the window panel stage?
Michelle, usually i don't knead till window panel stage, so long elastic , smooth and shinning. of course you can knead till window pane stage, it will be even better.
Lovely
Hi
May I know which type of chocolate should we use compound chocolate or compound?
Huiqi
Huiqi, I just use normal Lyndt dark chocolate
Hi Sonia, may I knw how much white and dark chocolate needed?
Thx.
Hi,
May I know while proofing for double size, how Long will tat be? N The last proofing do I need to cover w damp cloth or just leave it open air? Thank
Casey, sorry i didn't record the exact amount
Zune, it depend on the weather, if weather is warm, usually take about 45-60mins. yes please cover with damp cloth for 2nd proofing also.
Hello, I found this by picture and took me by heart and tried it the next day :) it was my first baking with yeast, so I was curious :) i changed Nutella for cherry jam, and it gave a savoury kich to the sweetnes. and it was jummy. next time i will have to make more, so they will last longer then one hour :) taking your recipe to Europe and thx a lot! a.k.
I made this last night and my 2 boys didn't notice. There were smiles in the morning and this was breakfast for them. Thanks for sharing this adorable recipe.
Post a Comment